You are in: North America
Change location
You are here
Account Management in Sage Track
Adding and Editing User Accounts
Adding a new user is a process accessed from the Admin Tools section of the dashboard.
Adding User Accounts
In each of the following sections, completed the fields listed below.
TIP: Always search for the user before adding a new user to avoid creating duplicate accounts.
TIP: Where a user prefers to use a personal email address as their primary contact email, enter their institutional/organisation email address as their secondary email address where possible
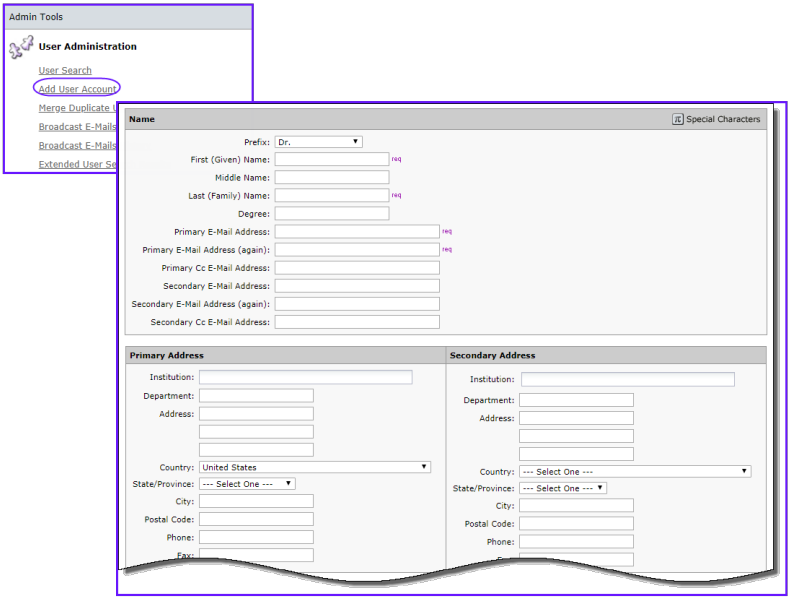
The User ID defaults to the primary email address. An email with a temporary password is sent to the user when you finish adding the account.
Editing a User Account
You can edit a user's account to update or change any of the account information. First, perform a user search in order to display their account. Click the Edit button on Search Results to view account screens. Move through the editable pages and click Save when you have completed your changes.
Managing User Accounts
Unavailable Dates and Email Exemptions
We encourage editors and reviewers to use the unbailable dates function to prevent assignments during certain periods.

Deactivating a User Account
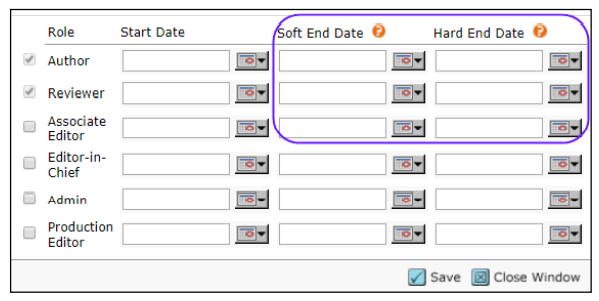
Use the Soft End Date and Hard End Date fields to inactivate a user’s role. You cannot remove a user role by deselecting the checkbox next to the role. Instead, use the Start Date and Soft End Date and Hard End Date fields to inactivate the role by calendar date.
When a Soft End Date is entered for a role, the user will have the privileges of that role only for papers they were already working on, but will not be able to be assigned any new papers under that role. This function is particularly useful for editors who will be leaving their role, but, need to complete work on manuscripts assigned during their tenure.
When the Hard End Date passes, the user will no longer have privileges for that role. If a journal is using the feature to automatically assign the editorial staff member who worked on a manuscript to later revisions, those revisions may be automatically assigned to them during the period between the Soft End Date and Hard End Date, even though they would not otherwise receive new assignments during that period.
Excluding Reviewers
You can designate a Reviewer as "Excluded" on their User Permissions & Roles page. When you designate a Reviewer Status of Excluded:
- That reviewer can still to log in and access their Reviewer Center.
- Their name does not appear in a selection dropdown list of reviewers.
- If an Editor or Admin tries to create an account for an excluded reviewer, they are notified that this person already exists in the system and is not eligible to review the manuscript.
- Reviewers marked as ‘excluded’ are not provided with any indication of this setting.
TIP: If a reviewer asks to be ‘removed’ from the system, we recommend excluding them as a reviewer instead, as this prevents them having an account re-created and invited in the future. It is important that you notify the reviewer of this and give them the option to have their account deleted if they still wish.
Merging Duplicate Users
You should routinely check for duplicate user accounts. Duplicate accounts can prevent user from logging in, from getting their password when using the Password Help function, from locating a manuscript for review, and even from locating a manuscript that has received a decision. Thus, it benefits the journal to keep these duplicates to a minimum.
Multiple accounts can result from a user who has been entered into the system more than once, from Editors adding Reviewers "on-the-fly", from authors adding co-authors, and from users creating a second account. To correct such multiple accounts the solution is to merge them.
Considerations when Merging Duplicate Users
Merging cannot be undone and should be done with caution. Before merging any account, it is important that you first consider the following.
- Confirm that the two (or more) accounts are for the same person before merging. You can generally do this by carefully examining the account details, but occasionally you may need contact the user to confirm.
- Determine which account should be the primary account.
- Only select accounts for a single person at a time.
- When selecting accounts to merge, if you see two accounts for John Smith and two accounts for Jane Smith, only select the accounts for a single user and perform the merge. Return later to merge the accounts for the second user. If you selected all 4 accounts, they would all merge, combining information for both John Smith and Jane Smith in the same user account.
- What is merged?
- Historical manuscript data
- Correspondence
- Tasks to be completed.
- What is not merged?
- Account information (address, password, etc.)
- Keywords o Comments
- "Has pending reminders for"
- Admins may not merge accounts for other Admins If this confirmation window shows pending reminders, consider merging the accounts the other way. If you merge away an account with pending reminders the system will send the review reminder letters even after the user has submitted the review. There are 2 ways to access the Merge Users page: from the user Search Results page and from the Merge Duplicate Users link located in the Tools section of the Admin dashboard. Instructions for each are detailed below.
There are 2 ways to access the Merge Users page: from the user Search Results page and from the Merge Duplicate Users link located in the Tools section of the Admin dashboard. Instructions for each are detailed below.
Merge Users Search: User Research Results Method
If you notice duplicate user accounts when you have performed a user search, you can easily merge duplicate accounts from User Search results.
- Check the box to mark for merge each duplicate account and click the Go to Merge button.
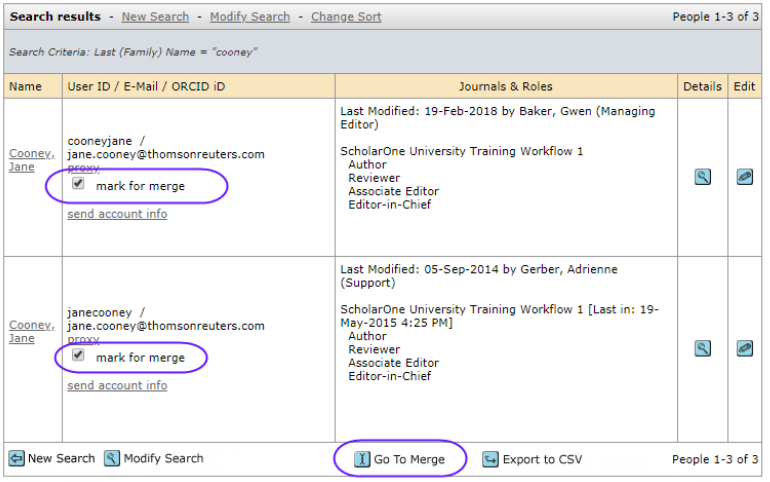
- The Merge Users page opens, with the selected accounts displayed in the Search Results.
Merge Users Search: Merge Duplicate Users Method
- Select Merge Duplicate Users from the User Administration area of the Admin Tools dashboard.
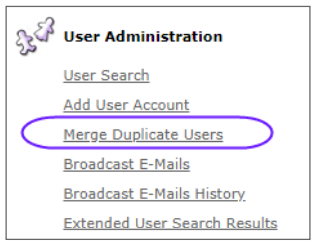
- The Merge Users screen displays. Select the radio for the search option you'd like to use. By clicking the radio button next to "Perform the search below," you can search for a specific user
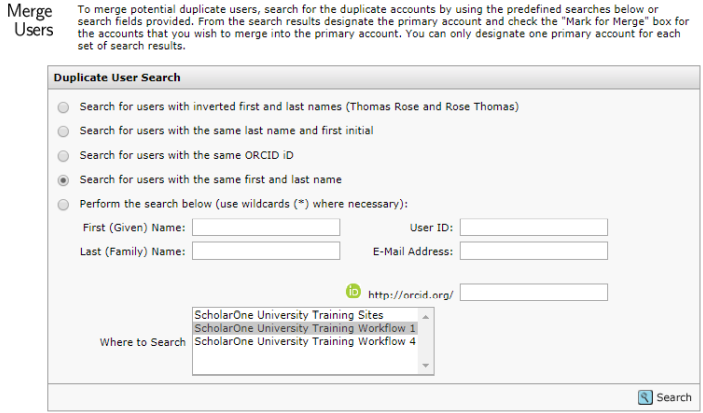
- Click the Search button to display the results in the lower half of the page.
Merge Users Results and Actions
Both search methods will provide the following results view
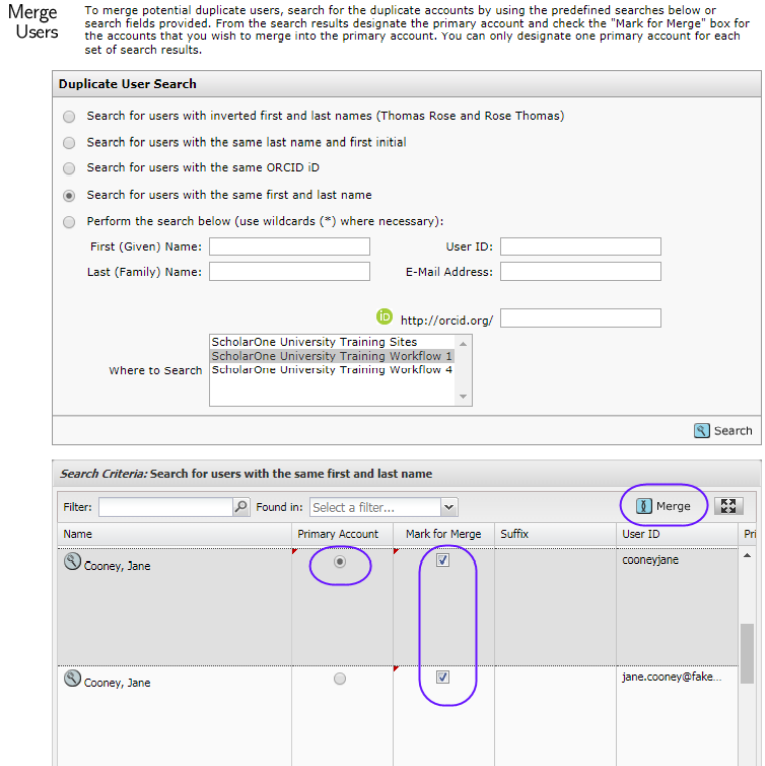
Take the following actions:
- Review the information to confirm that the accounts actually belong to the same person.
- This can usually be determined by the user’s affiliation, ORCID iD or other account information
- Determine the primary account
- This can usually be done by scrolling along to the ‘Account History’ field to see which account was modified most recently
- You may need to contact the account holder (i.e. if more than one account was recently modified).
- Select one radio button to designate an account as Primary Account. The other account information will merge into this one.
- Click the Merge button.
- The system asks for confirmation before the merge is completed.
- A record of the merge is written into the primary account's Comments field. Click the OK button.
- When the merge is complete, you are returned to the search results. The accounts you merged are removed from the results. You may continue merging users from these results if desired.
Using Account Flags
Account Flag functionality allows to create custom flags within the system to assign to user accounts. These can be used to mark users accounts for any number of practical reasons.
- Click on the magnifying glass to view the user’s account information.
- Select the radio button(s) next to the appropriate flag(s) and click save.
- Authors and reviewers can’t view flags assigned to their account.
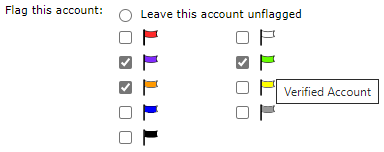
TIP: To view the flag label you just hover over the flag with your cursor.
NOTE: Account flags can’t be configured by Admin. Contact your Publishing Editor to add/edit your journal’s user account flags.